
In this tutorial, I will go over my current approach for hosting my decentralized application (dapp) code for free with GitHub Pages. This proves to be a great option for getting your dapp up and running quickly and for free. I will also show how to set up GitHub actions CI so that code changes are automatically deployed. I will use React as a frontend framework, but this can be easily changed.

It’s been about a year since I started experimenting with blockchain, smart contracts, solidity and dapps. I quickly realized that writing a good UI is almost as important as the smart contracts behind it. Writing the web application goes hand in hand with the rest of the logic. In this tutorial, I will go over how I integrate GitHub pages with my current project feltoken.ai.
Are GitHub pages right for you?
The most important fact is that GitHub Pages are for static pages. That comes with certain limitations. You can’t host a backend there! However, if you are building a purely decentralized application it will rely only on the smart contract state. Hence you don’t need any extra backend. The smart contract will then act as a backend itself and you just need to host your frontend. That’s where the GitHub Pages comes in.
Setting up the Project
As a base code, I will use Brownie’s react-mix. Brownie itself isn’t really important for this tutorial, but the repository has everything we need for this tutorial. Feel free to use Truffle or Hardhat.
There is quite a lot of code in this repository. Most of the code is irrelevant for this repository, but still, there is a quick overview of repository directories:
client/– folder containing frontend code written in Reactcontracts/– smart contract written in solidityscripts/– Brownie’s deployment scripts for deploying smart contract to blockchaintests/– scripts testing the smart contracts
You can read the README.md file for more instructions on how to work with the repository. Right now we are only interested in running the command: brownie run deploy. This command will deploy the smart contract to the blockchain. It also creates artifacts that are later important for communication with the smart contract using the web3.js library. In this case, artifacts are stored in client/src/artifacts (as specified by brownie config). Truffle and other tools might generate the artifacts in a folder named ./build or something similar. You will need to commit the necessary artifacts into the repository in order to use them with the frontend!
Deploying the Frontend
Once we have the smart contracts ready, we can start writing the frontend. In our case, the frontend is located in client/ folder. Inside this folder, you will find a familiar structure produced by create-react-app. You will also find some example code, but building the UI is up to you.
Once ready, we can start writing the GitHub action which will deploy the client/ folder to GitHub Pages. You should place this action into folder: .github/workflows/deploy_dapp.yaml. The action looks as follows:
First, we defined that the action will be executed on every push to the main branch. Then we define the steps:
- Get the latest code
- Get the latest Node.js 16.x (we also set up a cache for faster execution)
- Install the dependencies
yarn install ...(this could also benpm install) - Build the React app as
yarn build(ornpm build)- This produces the final web application in
./client/buildfolder
- This produces the final web application in
- Deploy by copying
./client/buildintogh-pagesbranch
The last step is important as the gh-pages branch will act as storage of the latest version of the web application. The branch will be created during the first run. You shouldn’t change this branch manually. You can also change the action to deploy the application into a different repository.
Repository Settings
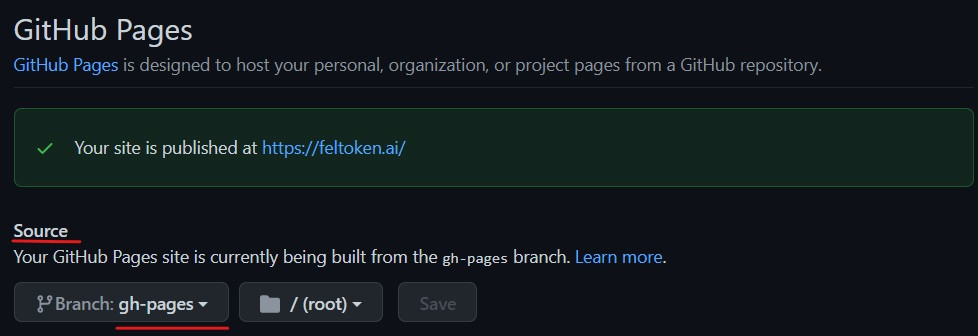
The last step is to go to the repository settings: Settings > Pages. Here under the Source you will select gh-pages as a branch and leave the root to /. Hit Save and that’s it. Your first dapp is up and running!
There are more settings to GitHub Pages. For example, you can set your own domain. It’s not part of this tutorial, but you can find more about it in the official guide.
Warnings
You have to be a little bit careful when building your application in strictly static settings. Don’t leave your private keys anywhere inside your code.
Also in case you are using React Router, you will need to use HashRouter instead BrowserRouter. As BrowserRouter requires further server settings to work correctly. There might be a few more hiccups along the way, just keep in mind that you are dealing with a static page.
Conclusion
I find this solution easy to set up in just a few minutes and it saves a lot of time during development. You can always switch to hosting on different servers. Therefore, I would recommend this approach at the beginning of the development.
This tutorial was created during the development of the FELToken project which is a tool for running decentralized federated learning on blockchain. If you find it helpful, please follow us on Twitter @FELToken for the latest news and more tutorials.
Leave a Reply